
If you’ve ever gone hiking in a pine forest and touched the trees, you’ve probably felt pine sap.
It is very sticky when fresh and turns into orange globs when dry. You might not have thought much about it, but pine sap is incredibly useful.
If you want to improve your survival skills, bushcraft skills, or homesteading knowledge, then you’ll need to know how to make pine pitch.
How to Collect Pine Sap
The first thing you are going to need to do is collect pine sap. I’m going to assume that you already know what a pine tree looks like. 😉
There are some species which apparently give off more sap, but you’ll probably be using what is available.
To collect the sap, you could even just walk around and find pine trees which have broken branches. The sap will have oozed out on its own and crystalized. Pick off the pine sap crystals and put them in a metal container.
A faster method of collecting pine sap is to tap the tree. Note that this does damage the pine tree and can expose it to pests and disease.
In a pine forest, this might not matter much. If the pine trees are on your property, then you might want to rethink it.
Tapping a Pine Tree
You will need:
- Machete or a survival axe to tap a pine tree.
- A metal bucket for collecting the sap, or a sturdy plastic bag
- One or two pieces of galvanized iron to act as a gutter
- Hammer and nails, or wire
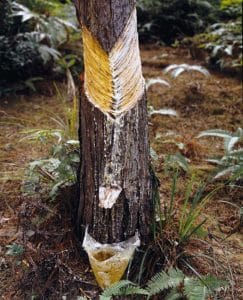
Step 1: About 3 feet from the ground, cut off the pine tree bark in a V-shape. You will need to cut downward. The size should be about 12 inches high. Alternatively, you can cut away a thinner but taller strip of pine bark.
Step 2: Attach your gutter. The gutter is made from a piece of flexible galvanized iron. There are two ways that you can attach the gutter. One is to use a single piece of galvanized iron which has been bent into a V shape. The other method is to use two pieces of iron which create “steps” on the tree. With each method, the purpose of the gutter is to gather the sap as it drips off the tree and funnel it into your collection device.
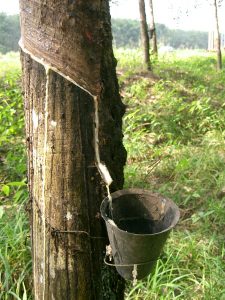
Step 3: Attach your collection vessel. In Brazil, they use special plastic bags which gather the pine sap. It is a bit hard to get the pine sap out of the plastic bag though. With a metal container, it is easier to get the sap out, but it is a bit more difficult to attach the container to the tree.
I would go with the metal vessel because you don’t have to worry about it staying open or spilling. Use nails to attach the vessel. Alternatively, you can attach it by wrapping it with wire around the tree.
Pine Resin, Pitch or Tar?
Before we go any further, let’s get our definitions right. There is a lot of confusion about the difference between pine resin, pitch and tar.
Resin: Resin is the liquid which is stored in the outer cells of trees. When a tree is injured, resin will ooze out and clog the wound – just like our blood clots to heal a wound. There are also synthetic resins. When you collect hardened pine sap, you are actually collecting resin.
Pine Tar: Pine tar is made by heating pine wood at really high temperatures without letting it catch fire. Moisture (water) and tar will drip out of the pine wood as it is heated, leaving behind charcoal. It is collected (usually through a strainer at the bottom). As described here, tar is basically liquid smoke from the pine wood. Pine tar can be used as a sealant, for medicine, and for making soap. Here is a good photo tutorial on how to make pine tar.
Pine Pitch: The terms pine pitch and pine tar are often used interchangeably. However, pine pitch is actually pine tar which has had the moisture taken out of it. Thus, pine tar will be more liquid and pine pitch is harder.
How to Make Pine Pitch
- Put the pine resin (sap) you collected in a metal can. A soup can works well.
- Create a double boiler. Pine resin is highly flammable. You don’t want to melt it directly on a fire because you’ll end up with a 7-foot high flame. Instead, create a double boiler. A double boiler is basically a pot within a pot. The bottom pot has water in it. The heat boils the water. The steam from the water then travels upwards and heats the top pot. Put your can of resin in this top pot. Under no circumstances should your can of pine resin touch the heat source.
- Melt the pine resin. Again, don’t let the can with the pine resin directly touch the heat source! You’ll end up with a giant flame.
- Strain the pine resin. You can make your own sieve out of a clean can with holes poked in it. This will get out the bits of dirt, bark, and bugs. Collect the strained resin in a clean can.
- Put the can with the strained resin back in the double boiler. This will keep the resin liquid as you do the next steps.
- Add crushed charcoal to the resin. Stir it in with a stick. You’ll need about 1 part charcoal to 3 parts resin. However, the ratio can change depending on what you want to do with the pitch. Note that, historically, pine pitch was made with charcoal from the same pine trees as the resin was sourced from. Those pine trees were burned to make an ultra-clean charcoal. You can use any wood charcoal for your pine pitch though.
- Add optional substrates. Most people recommend adding dry dung from herbivores (like a rabbit). But you can also use sawdust from real wood or animal hair. This makes the pine pitch stronger. You’ll need to add about half the amount of substrate as charcoal. Next, add a bit of beeswax or tallow. This makes the pitch more flexible and easier to work with. Only add a little bit!
- Test your pine pitch. Stir your pine pitch with a stick (a pencil works well). Run the stick under cold water for a few seconds. Then touch the pine pitch on the stick with your fingernail. It should be firm but have a bit of give to it. This means it is done! If not, play with the ingredient ratios until you are satisfied.
This is a surprisingly versatile substance, check out these uses for pine tree sap now.

I’m following the directions to make pine pitch. I can successfully melt the collected resin but when I go to strain it, it hardens almost instantly when out of its double boiler heat. So it doesn’t strain effectively. Any tips for this? Thanks!
Do you know if the variety of pine matters? Should it be white pine or red pine?
You can use any pine pitch. Does the variety matter? Yes and not. Some types of pine do produce more sap than others or have higher-quality sap. But you’d have to talk to a botanist to know about these differences, especially since there are so many types of pines and I doubt all of them have been extensively studied.
What is pine pitch used for?
Hi, I have some white pine in my yard. I harvested some of it and I found some larvae. There is no larvae in the sap I harvested but I’m wondering if it is still okay to use? it’s not a clear amber color like I see in pictures. Some parts are brown, some are amber, and some parts have little red spots in them.
Great write up. Thank you
I recently collected a few small pine sap strings dripping from the outer bark of the tree. It hardened eventually and when I tried to light it w/direct flame later it just fizzled and shrunk into a smaller sticky glob. No flame at all. Did I collect sap or pitch or are they the same thing. I always heard pitch was flammable.
bro read the article above monk
I have tapped rubber trees. You should only make a thin cut sloping downwards on half the trunk of the tree. That way you do not kill the tree but can harvest the sap every few days or so. The picture you have shown, cutting a vee and stripping a lot of bark will kill the tree as you have effectively ring-barked it.
Thanks for the heads up Wills. The less bark that needs to be removed the better.
Can it be sold commercially?
Don’t see why not but you would need to check the laws in your state.
This article is a bit awkward. Sap is the liquid that moves nutrients and water into the roots and leaves of a tree through cellular paths inside the tree. The authors confuse “sap” with resin and rosin, which are expressed through a different process to protect damage to the tree bark, which is compatible with the method for collecting the resin by “cat-facing” or intentionally damaging the bark so that the tree procduces resin that can be collected. Sap can be collected by drilling a hole in the tree and inserting a tap and bag or bucket. These two materials are distinct. Sap is mostly water, with simple sugars, hence the delicious syrups which can be made with many tree saps. You cannot render resin edible, in fact, turpentine is the primary ingredient, and while very useful, is poisonous.