There are a lot of ways to make a shelter, but the A-frame is considered the best for most situations, such as if lost in the woods.
Compared to other shelter configurations, like the lean-to shelter, the A-frame is quick to make, traps heat well, and protects against the elements from all sides.
If you have basic supplies like a survival tarp and rope, you’ll be able to make an A-frame shelter very quickly. However, it’s possible to make the A-frame shelter with absolutely no supplies.
Here’s how to do it.
Also Read: How to Survive in the Wilderness
What Materials Do You Need for an A-Frame Debris Shelter?
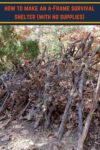
A “debris shelter” is a shelter made with natural supplies you find in the wilderness. In most cases, the debris is going to be branches, sticks, and leaves. You can also use things like pine needles, moss, ferns, bark, or even mud and snow.
Important: Follow Leave No Trace!
If you are making a survival shelter for fun, don’t break any live tree branches or kill plants. Don’t use moss for coverage either (it takes a long time to regrow). And always take the shelter down when you are done. People like me don’t want to see signs of other people’s presence when enjoying nature.
How Long Does It Take to Make an A-Frame Debris Shelter?
Expect it to take anywhere from 1 to 3 hours to make an A-frame survival shelter. In fall when there are lots of leaves on the ground, it will be a lot faster to make the shelter. If you find yourself lost in the wilderness, make sure you start making your shelter long before darkness falls!
Making An A-Frame Shelter Instructions
1. Find a Ridgepole
The ridgepole is the “backbone” of your shelter. It should be at least 2 feet longer than your body and sturdy enough to support the weight of your shelter. You can often find a fallen tree to use as your ridgepole.

2. Prop Up the Ridgepole
If using a fallen tree for your ridgepole, then you won’t need to prop it up anywhere. Otherwise, you’ll need to prop up one side of the ridgepole.
The easiest way to prop up the ridgepole is to find a V-shape groove in a tree. Or you can prop it up on a tree stump, large rock, fallen tree, etc.
If you really can’t find anywhere in nature to prop up the ridgepole, then find two Y-shaped branches. Use these and your ridgepole to make a tripod. Make sure the tripod is sturdy though – you don’t want your shelter falling down on top of you!
Important: The entrance to your shelter should be pointed away from the wind.

How High to Prop Up the Ridgepole?
When making an A-frame shelter for one person, it should be a bit below waist height. If making the shelter for two people, it will need to be a little higher than waist height. If you are making a raised bushcraft bed under the shelter, then it will need to be higher.
Don’t make it too high or your shelter won’t trap heat as well. I like to lay down underneath the ridgepole to get an idea of how big the shelter will be.
3. Make a “Broom”
You can use your hands to gather leaves and other debris, but you can end up cutting your fingers on thorns, broken glass, etc. Because of this, I always make a “broom” out of twiggy branches. It makes gathering leaves faster too.
")
4. Sweep Debris Underneath the Ridgepole
You need a debris “bed” in your shelter. Otherwise the ground will literally suck the heat out of your body and you’ll be cold.
I actually made a raised bed for my shelter out of sticks and leaves.
But, the easiest way to make a bed is to just put a big pile of leaves in your shelter. I like to do this before making the shelter because it’s easier to get all the debris in there.

5. Add Ribs to Your Shelter
Gather lots of long sticks and lean them against the ridgepole to create “ribs.”
The ribs should be set so there is 6 inches on each side of your body (or bodies if making a shelter for two people). Don’t make the shelter too wide or it won’t trap heat well. Yes, it’s going to be snug inside!

6. Add Coverage Over the Ribs
Look for branches with lots of twigs and leaves on them. Put these over your ribs. You want these to make a “net” or “web” over the shelter.
They are what will hold the debris on top of the shelter. Without them, the debris would fall straight through the ribs.
Conifer branches work really well for this. But, unless it is an actual survival situation, please don’t break branches off trees!

7. Pile Debris Onto the Shelter
Pile debris on top of “webbing” until the whole shelter is covered. Also pile lots of debris along the edges of the shelter to keep out the wind.
You’ll need a LOT of debris to cover the shelter. Aim to have at least 1-2 feet of debris on the shelter.

8. Check Coverage and Add More Debris
Look inside your shelter. Is there any light coming through? If so, then you need more debris. Keep piling debris until you can’t see any light coming through.

9. Add Branches On Top of the Debris
Place a few long branches on top of the debris. This will help hold it in place so it doesn’t fall or flow off.
10. Make a “Door”
You need a “door” for your survival shelter to block wind from getting into the shelter and also prevent heat loss. There are a few ways to make this door.
The easiest is to just gather a big pile of debris and place it near the entrance to the shelter. Crawl into the shelter and then pull the pile of debris towards you to block the entrance. Now you are ready to sleep. 🙂


I’m definitely trying this! I may only be 10 years old, but I love bushcraft shelters. sleeping in these make me feel at home, and it relieves me of pressure from cleaning up my parents’ (figurative) mess, not to mention the burden of having to deal with my advanced classes……5/5 stars! I’m gonna tell my woods-y friends about Primal Survivor! – Landyn Speed
I also used to love making shelters when I was 10 🙂 And, while I didn’t realize it then, playing in the woods taught me a lot of skills I use in my adult life. Have fun!
I tried this! It was very sturdy although there is only so much i can do in my backyard! Would recommend to other bored 12-year-olds! ))